Friday, July 19, 2013

Successful Gardening in a Tiny Back Yard

Before we moved into our townhouse we lived in a rental house that had a huge garden in it.  I was very successful at growing giant sunflowers, tomatoes and carrots, I even grew delicious giant ears of corn and had zucchini taking over my life. Well, we bought our townhouse, which I love, but the garden is lacking. It has a small 30' x 15' back yard that is half patio.   
 
There are of course, pros and cons to not having a massive yard and garden to take care of, like more time to do everything else, smaller water bills and less sun burns and heat stroke in the Utah summers.  
 The first year in our townhouse, I tried raised garden beds. They were a huge flop.  They didn't drain properly and the soil in them was such junk that nothing would grow very fast.  By the end of the season we had not one tomato.
The next year I tried container gardening as you can see in the picture below.  It was slightly more successful.  By the end of the season I had 4 green tomatoes which my son picked before they could ripen and I didn't even get one squash.  I know this method works for some... but it certainly didn't work for me. I thought long and hard about what made my garden successful for those two years in the rental house.  One, the landlord dumped amazing black topsoil AND compost from the waste processing facility into the garden. Amazing soil, very important. It got almost full sun. My backyard gets less than 6 hours a day of direct sunlight. But that year I tried container gardening something funny happened. A stray tomato from some kitchen waste got thrown into the back under a tree. It got maybe 3 or 4 hours of sun a day and it grew better than anything else I had planted that year. So I knew that sunlight in my yard should be less of an issue than I thought.  
Container gardening, not very successful. Grass area of 15'x15' before beds were put in. 
I decided I would get rid of the grass and use the soil available. I used the cardboard method.  I covered the spots I wanted to be dirt in cardboard and covered it with top soil. I left it all fall and all winter and all spring.  When the ground thawed I pulled up what cardboard had not composted and threw it out.  Then I turned it all in with a hand tiller.  Back breaking! But good exercise. All winter long we threw all of our kitchen scraps out into the soil.  I smashed every egg shell we used and threw it out there, knowing that the dirt in this area is often lacking calcium, which the tomatoes especially need but it benefits all plants.  
In the process of composting the grass for garden beds.
As you can see in the picture below, come June I had thriving tomatoes on the right (started from seeds inside), a zucchini that is now 3 times that size (started right in soil from seed), and some various squash and pumpkins, all stated in the soil from seed. I also have some peppers near the tomatoes, and have already harvested peas and a full crop of lettuce.  

squash vines after a month of growing. They grow so rapidly!  We went away for 4 days and when we got back the vines had doubled in size prompting us to build the permanent arbor.  
 Since my vines have gotten out of control, and I just don't have the heart to get rid of some of them I convinced the husband we needed to build this arbor out of scrap wood.
Simple arbor I designed and the husband helped build.  All out of scrap wood. 
 You can see below that the vines have already climbed over the arbor, with some coaching by me.  I have a small push mower that takes about 90 seconds to clean up the horseshoe shape of grass path.  I have a drip system tied into my hose and each section of the garden has one sprinkler.  This has seemed to be enough.  I have a simple timer that I just have to manually set to the time I want it to run each day.  I spend about 15 minutes a week weeding.  I expect by the end of August I will have plenty of food coming out of my garden. I only wish it was bigger so I could spend more time gardening!
Aerial view of tiny yard.  You can fit a lot of plants in a small space, they just need some sunlight, not full sun, some water and GOOD soil is the key. 


Follow Me on Pinterest

Wednesday, May 15, 2013

A Happy Birthday Indeed

Several months ago my dad came to my sisters and me and asked us to throw a party for my moms birthday. Several years ago we threw my dad a very special party for his big 6-0, it was complete with entertainment (grandchildren prepared skits etc.) fireworks, (his birthday is July 3rd) and BBQ  mmm mmm.  So my sisters and I went to work to throw a party that would be all about mom.  I took charge of the decorating.  I wanted her party to be uniquely HER.  I tried to choose a non fussy theme, and stick with colors I knew she would love.  When I think about my mom, for some reason spring resonates with me.  Maybe because she likes pastel colors so much?
 We have a huge family.  7 kids, 6 of which are married, 5 of which have kids!  So we needed every chair we could find.
 My oldest sister has an amazing house with a built in partay room!  Its been used many times by the entire family already, even though it is not even finished yet.
 I have been inspired by the many pictures all over the internet of these fun and EASY tissue paper pom poms.  I bought a huge package of tissue at hobby lobby and simply folded layers of it like fans.  Then you trim the edges and pouf them out.  I added a few balloons for color, including a few "hot air balloons."
 My sister in law is a cupcake GENIUS.  I am not kidding, her cakes taste like heaven and they are usually vegan! I don't know what her secret is.  Aren't these babies gorgeous? I was so impressed with them and so was everyone else that no one wanted to eat them. Once we all took one bite though, they were gone in minutes!  (Email iheartcupcakeslc@gmail.com for more information about her yummy creations)
It was a simple, but beautiful party.  It was a big surprise for my mom.  She thought she was just going over to my sisters for a nice. little birthday dinner with her family.  Of course we couldn't hide that many cars so she knew what was up once she drove into the driveway.  It's a wonderful blessing to have all of your family in one state and on speaking terms!
Follow Me on Pinterest

Monday, April 29, 2013

DIY Inspiration, easy mirror makeover.

It's easy to take a nice piece of furniture that speaks to you, and make it sing to you instead! 
Follow Me on Pinterest

Friday, April 26, 2013

Rast Hack

Here is my version of an Ikea Rast hack.
 I did a simple image transfer technique for the sides.
 More image transfers on top. I also added a piece of particle board over the front of each drawer to make them less flat and boring.  The hard ware was also upgraded. The Rast comes completely unfinished so i painted the drawer fronts with a nice antique white latex and the top and sides with poly-stain over my image transfers. .
To make the image transfers, all you have to do is print out your image in reverse on freezer paper, then lightly moisten the surface you want to transfer onto and press it into place.  The freezer paper can be washed with a wet rag and used over and over again. 

UPDATE:  5/9/13
Here is another Rast Hack


Follow Me on Pinterest

Vintage Buffet Makeover Step By Step, Part 2

This is part two of a buffet makeover, if you want to see the first part, click here.  
I finished sanding the top of the buffet.  I always use a low grit sandpaper like a 60 grit for stripping paint off of a piece of furniture. Otherwise you will be sanding for the rest of your life. It can leave marks on your wood though, so you cant be lazy and leave it like that. You need to clean up the marks with a 100 grit paper, followed by a 150 grit and finish with a 200 grit or more paper.  This will leave your wood professionally smooth looking and feeling.  
 I added my Polystain and it looks great. It took 3 coats.  I sanded with my 220 grit sandpaper between each coat and also used some steel wool.  When the last coat was done, I used steel wool and then rubbed on a furniture wax, then hand buffed it.
 It was worth all of the work. The resulting finish is perfect.
 I had to copy all of those steps on all the pieces that I was going to stain. So all of the drawers and doors got sanded 4 times, and 3 coats of poly stain then one coat of wax.  It didn't take as long as it sounds. The drawers were super fast.  Each one only took maybe one minute or less for each type of sanding.  The higher the grit on the sandpaper the faster it goes too.
 After I finished the top of the buffet, I painted the bottom white to match the hutch.  3 coats and light sanding in between.
 I can already tell it is a wining combo from what I have finished so far.

 I couldn't get all of the stain out of the shutter doors.  Sometimes you have to change your game plan.  Going white was my best option, but I didnt want the whole door to be white.  I carefully painted each louver of the shutter and every nook and crannie.
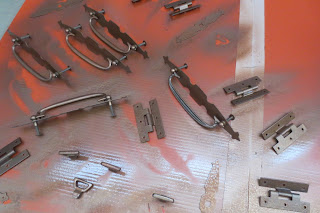
 The hardware was original yes, but the color of brass is unappealing to most people.  I went with a nice hammered finish enamel paint to give it a face lift. One coat is all it took.  Be sure to lightly spray one side, then turn it over and spray the other side after it dries, so you get even coverage.  Do not spray the back where the screws go in.
 Paint, dry, turn. Paint, dry, turn.  Do this until all visible sides of your hardware is covered. Never spray too close or too heavy, or you will have drips.
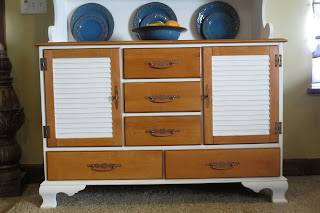
 I carefully, hand screwed all of the dry hardware back where it came from.   This was easy since I separated each door in a different bag.  I think it looks great just as a buffet.  Remember not to use a power drill or you could slip and ruin your new finish
 With the hutch on, it looks amazing.  I am so happy with it!


It looks like the stain is the same in this before and after pic, however the new stain is much less yellow than the old stain and lighter as well. It shows more of the natural wood grain.  Its always such a pleasure to take an old piece, and while maintaining its class and character, give it a little face lift!  Good luck with  your own furniture refinishing adventures and feel free to message me any questions you may have.
Follow Me on Pinterest

Thursday, April 18, 2013

Vintage Buffet Makeover. Step by Step Part 1.

I found a beautiful piece for furniture for a steal! I'm not going to say how much but I definitely got a good deal. This lady has got some cute curves and fun features.  It was someones grandmothers, so likely from the 70's or 80's.  Vintage, but not quite antique yet.
I don't usually like to share my furniture finishing secrets, but this time I will take you through step by step on how this piece is redone.
 1. Number one, always remove ALL hardware. Never, ever, ever paint the hardware.  (This excludes enameling it with a different color to change it.) I am talking about being lazy and just painting the whole shebang one color and going right over the hardware.  If you want your furniture to scream "AMATEUR" then by all means, paint right over your hardware.
 This piece had a lot of hardware. So I used a separate bag for each door.  

 These were tricky to get off. I gently lifted them with a flat head screwdriver.

 Look at this great hardware. I see a lot of people replacing old hardware with something more modern, even if they shabby a piece up. What a waste, the hardware is sometimes the most charming part.  I will be painting this hardware to an oil rubbed bronze color.


 Shutter front doors! Awesome!
 Nice legs!

 This piece has spots for little hooks, likely to hang tea cups from.  I will search high and low to see if I can find anything that will work, but thus far I have not.
 Always use a hand screwdriver, if a powered one slips, bye bye original screws.
 I found this interesting. One door had no paint under the hinges, the other one did.
 2. You must remove years of gummy, oily grime before painting an older piece.  I used alcohol in a spray bottle.

 Wipe down the whole piece.
 This blotching will happen, have no fear, just ignore it.
 The top of this piece is going to be white, so there is no need to completely remove the finish.  So what I did was just rough it up a little so the paint adheres better.  I used a 100 grit sandpaper. I highly recommend one of these affordable circular sanders.  They move in every direction, eliminating most sanding marks.
 See? Not fully removing the finish, just roughing it up and removing any glossiness.
 Here are the two paint products I will be using. I am going to strip and use a poly-shade on the fronts of the drawers and doors, and the case and hutch will be antique white.
 I will be adding non sanded grout to my white paint to enhance the durability and skip the priming step.
 You can get these handy paint pail pour spouts for $0.98!
 For each cup of paint add 2 Tablespoons of un-sanded grout.  But first you must mix the grout with a little bit of paint.
 It will be thick like this, then add the rest of your 1 cup of paint.  This will keep your paint from having chunks and lumps of grout.  Stir, stir, stir.
 Use a roller and roller tray.  This will help you get even paint coverage because it eliminates excess paint on the roller.  Also use a very smooth foam roller for furniture.
 A nice thick coat of paint is great. Never drippy or lumpy though.
 You will not be able to reach the corners with your roller, so have a tapered paint brush ready.
 At the end of three coats of paint, you can still see dark shadows and uncovered areas.  Always let the paint dry to the touch before starting the next coat.

 4 1/2 coats later I am finished.  This piece will be waxed as soon as the paint cures in a day or two.
 For the doors, I am staining them so I want to strip the original finish off.  I used 60 grit sandpaper on my sander to remove a majority of the finish.
 I was planning on glazing these anyway, so I left the darker original color in the crevices, it saves me one step and a little money. I choose a light pecan color, Poly-stain in satin.  I taped the glass off so I wouldn't have to scrape off any poly-stain I got on it, which would be more difficult and time consuming than taping was.  It's starting to look great!  I will show you how these doors come out on my next post. For now, they need to dry.     
Follow Me on Pinterest